
 Pin it
Dessert Transformation
These extraordinary cookies reimagine beloved carrot cake flavors in handheld form, elevated by a sophisticated brown butter cream cheese filling that creates an unforgettable taste experience. The magic happens in the balanced spice blend and fresh carrots that infuse moisture and natural sweetness throughout each cookie. I perfected this recipe during a spring when I craved carrot cake but wanted something more portable and shareable than a traditional slice.
Spring Indulgence
My journey with these cookies began when planning an outdoor spring gathering where traditional cake would be impractical. What started as a solution to a serving dilemma quickly became a signature recipe requested at every family function. Even my grandmother, who guards her traditional carrot cake recipe jealously, admitted these cookies captured the essence of her beloved dessert in a new, exciting form. My nephew, typically disdainful of anything containing vegetables, devours these without realizing carrots are the star ingredient.
Superior Components
- Old Fashioned Rolled Oats (1 cup): Provide essential structure and subtle chewiness that perfectly complements the soft cookie texture while adding wholesome heartiness
- Freshly Grated Carrots (1 cup): Deliver natural moisture and sweetness throughout the cookies, creating that distinctive carrot cake flavor impossible to achieve with artificial substitutes
- Brown Sugar (3/4 cup): Contributes caramel notes and moisture retention that keeps cookies soft for days, while enhancing the warm spice profile
- Signature Spice Blend: Combines cinnamon, nutmeg, ginger, and cloves in precise ratios for that unmistakable carrot cake flavor with depth and complexity
- Browned Butter (1/2 cup): Transforms ordinary cream cheese filling into something extraordinary through its nutty, caramelized notes that develop during the browning process
- Full Fat Cream Cheese (8 ounces): Creates the perfect tangy counterpoint to the sweet, spiced cookies that defines the classic carrot cake experience
 Pin it
Bakery Technique
- Cookie Creation:
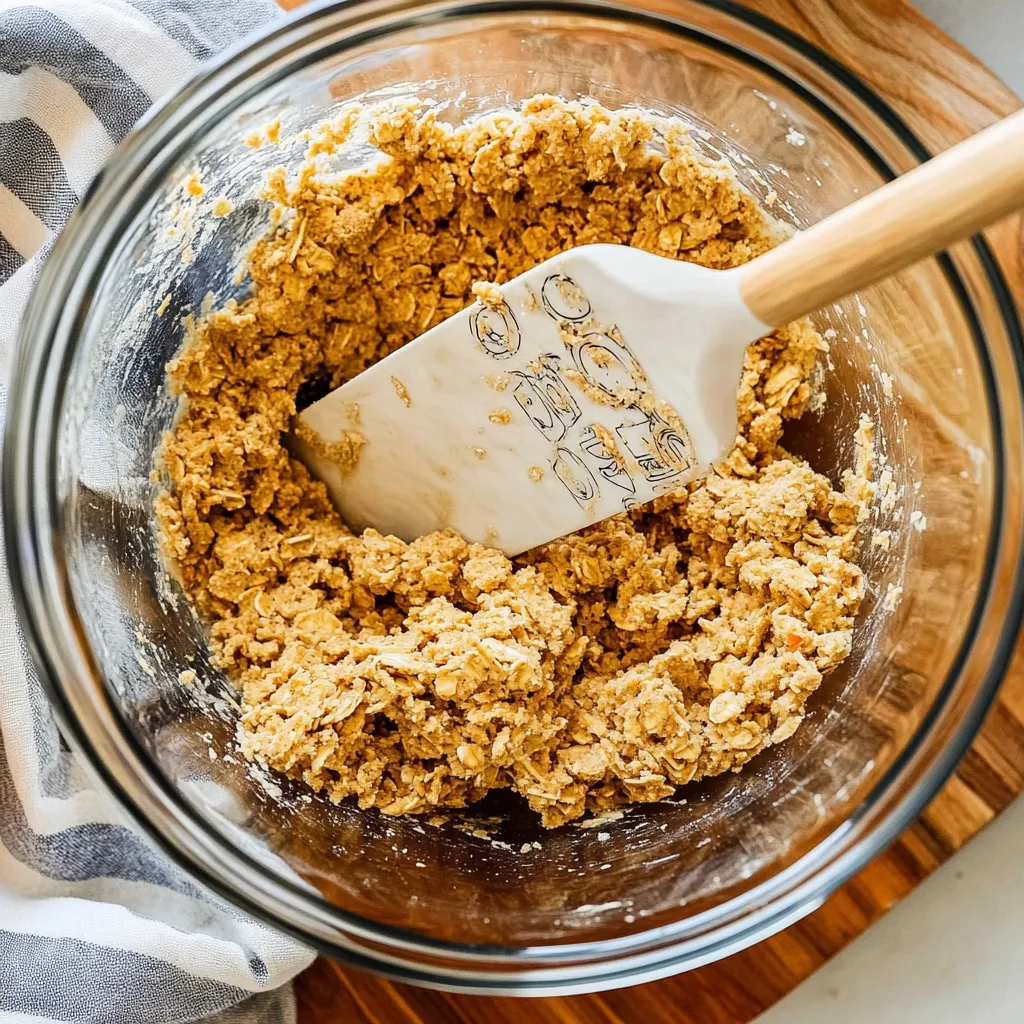
- Begin by properly preparing your ingredients for optimal results. Position oven racks in the upper and lower thirds of your oven and preheat to 350°F. Line two baking sheets with parchment paper for perfect release and even browning. In a medium bowl, whisk together 2 cups all purpose flour, 1 1/2 teaspoons cinnamon, 1 teaspoon baking soda, 1/2 teaspoon salt, 1/4 teaspoon nutmeg, 1/4 teaspoon ground ginger, and a pinch of cloves until thoroughly combined and any lumps are broken up. This advance preparation ensures even distribution of leavening and spices throughout the finished cookies. In a stand mixer fitted with the paddle attachment, cream 3/4 cup unsalted room temperature butter with 3/4 cup packed brown sugar and 1/4 cup granulated sugar until light and fluffy, approximately 3 minutes. This extended creaming process incorporates air and dissolves sugar crystals for ideal texture. Scrape down the bowl thoroughly before adding 1 cup freshly grated carrots, 1 large egg, and 1 teaspoon vanilla extract, mixing until just combined. The carrot moisture will initially make the mixture look slightly curdled, which is normal.
- Perfect Incorporation:
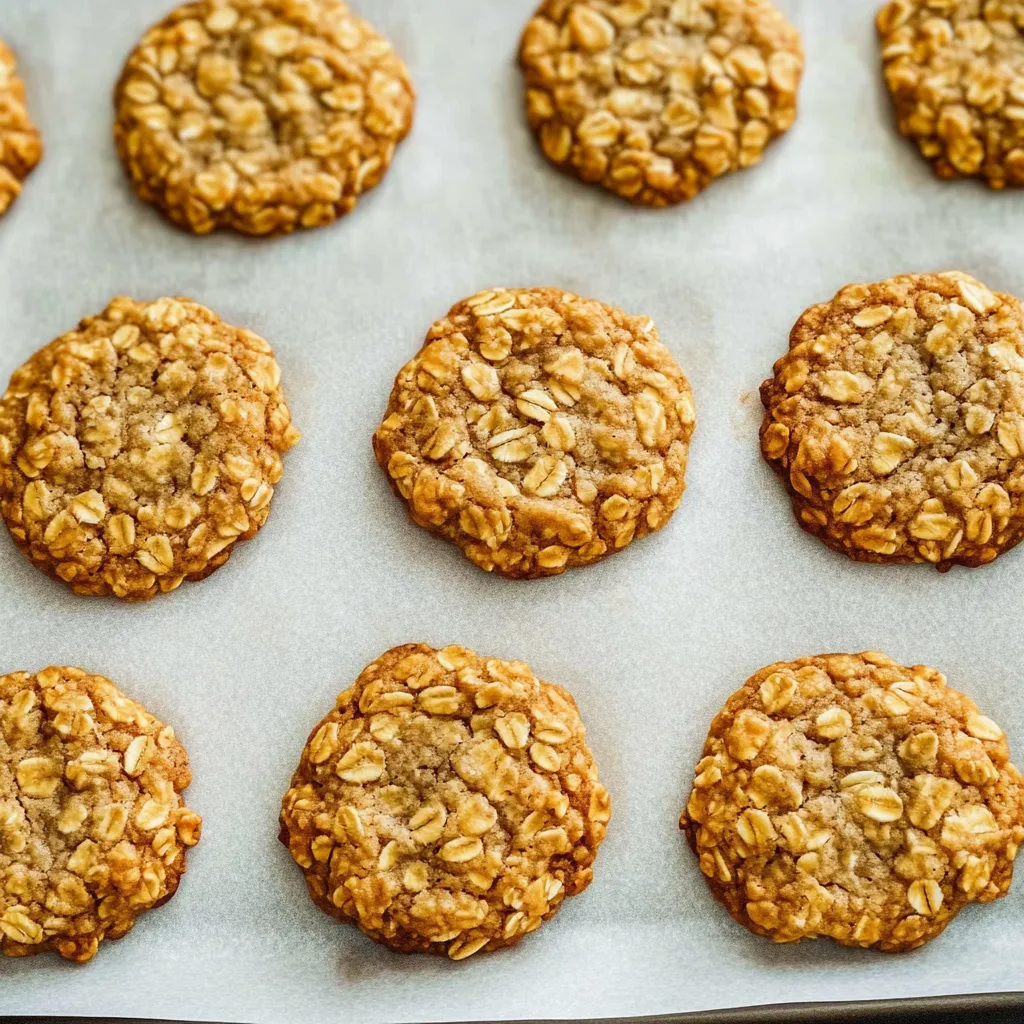
- With the mixer on low speed, gradually add the dry ingredient mixture to the wet ingredients in three additions, mixing just until barely combined after each addition. Overmixing at this stage develops gluten, resulting in tough rather than tender cookies. Remove the bowl from the mixer and use a rubber spatula to fold in 1 cup old fashioned rolled oats by hand, preserving their texture. If including optional mix ins, gently fold in 1/2 cup raisins or chopped nuts at this time. The dough will be somewhat soft but still scoopable. Using a medium cookie scoop or two tablespoons, portion the dough onto the prepared baking sheets, placing them approximately 2 inches apart to allow for spreading. For perfectly shaped cookies, roll each portion briefly between your palms to create smooth balls. Bake in the preheated oven for 10 to 12 minutes, rotating and switching the pans halfway through baking, until the edges are set but the centers remain soft. The cookies should appear slightly underbaked in the center when removed from the oven, as they will continue cooking on the hot pans. Allow them to cool on the baking sheets for 5 minutes before transferring to wire racks to cool completely before filling.
- Filling Finesse:
- While the cookies cool, prepare the extraordinary brown butter cream cheese filling that elevates these cookies beyond ordinary sandwich varieties. In a light colored saucepan over medium heat, melt 1/4 cup unsalted butter, swirling occasionally. Continue cooking as the butter foams, then begins to turn amber and develop brown flecks with a nutty aroma, approximately 5 to 7 minutes. Watch carefully during this process, as brown butter can quickly progress to burnt butter. Immediately transfer to a heat proof bowl, scraping in all the browned bits which contain tremendous flavor. Chill in the refrigerator until solidified but still soft, approximately 30 minutes. This cooling step is crucial for proper incorporation with the cream cheese. In a stand mixer fitted with the paddle attachment, combine the softened browned butter with 8 ounces room temperature full fat cream cheese, beating until completely smooth with no lumps remaining. Add 1 teaspoon vanilla extract and a pinch of salt, mixing to incorporate. With the mixer on low speed, gradually add 2 cups confectioners' sugar, mixing until just combined, then increase speed to medium and beat until light and fluffy, approximately 2 minutes. Transfer the filling to a piping bag fitted with a round tip, or prepare to spread with an offset spatula.
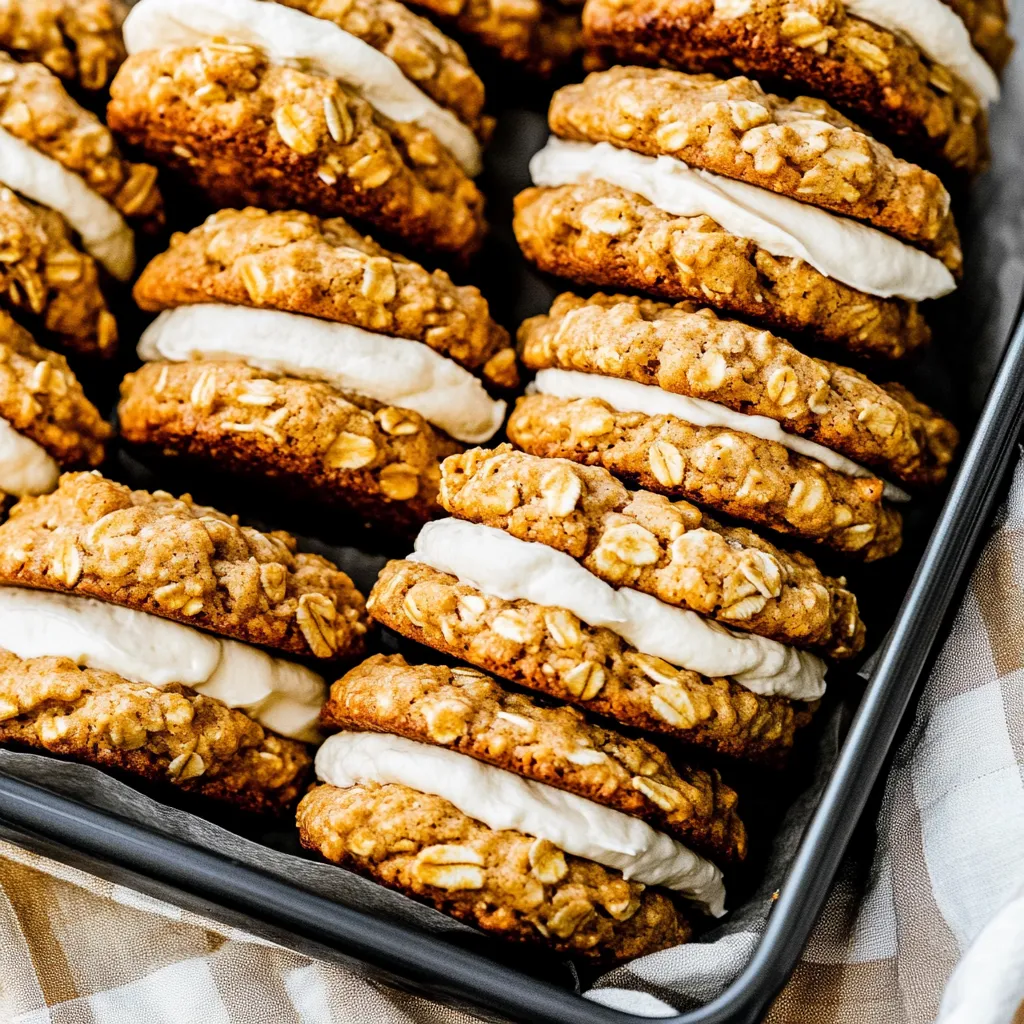
- Assembly Artistry:
- Turn half of the cooled cookies bottom side up on your work surface. Pipe or spread approximately 2 tablespoons of filling onto each cookie bottom, leaving a small margin around the edge to allow for spreading when the top cookie is added. Place remaining cookies on top, gently pressing to distribute the filling evenly without forcing it out the sides. For the most beautiful presentation, match cookies of similar size and shape when creating the sandwiches. If the filling becomes too soft during assembly, return it to the refrigerator briefly to firm up for easier handling. For the finished cookies to set properly, refrigerate them for approximately 30 minutes before serving, which allows the filling to firm slightly for cleaner bites. Before serving, allow refrigerated cookies to sit at room temperature for 15 minutes to soften the filling to the perfect creamy consistency that complements the soft cookies beautifully.
I particularly treasure the traditions these cookies have created in my family. During one memorable spring, my young niece joined me in the kitchen to help prepare these for Easter dessert. Her intense concentration while grating carrots and her pride when assembling the finished cookies created kitchen memories more valuable than any perfectly executed dessert. My mother now requests these cookies annually for her garden club's spring luncheon, claiming they bring more compliments than any other dessert she's served in thirty years of hosting. The process of browning butter for the filling has become something of a meditation for me, a kitchen task requiring presence and attention that forces me to slow down and fully engage with the baking process.
Serving Excellence
These versatile cookies welcome numerous presentation approaches depending on the occasion. For spring gatherings, arrange on a tiered stand decorated with fresh flowers for a stunning centerpiece dessert. Individual cookies can be wrapped in waxed paper and tied with ribbon for delightful party favors or bake sale offerings. When serving at home, pair with small glasses of milk or cups of hot tea for a perfect afternoon treat that transforms ordinary moments into special occasions. For Easter celebrations, consider adding a small decorative carrot made from orange and green royal icing atop each sandwich for festive presentation. During autumn, these cookies complement a dessert board alongside apple cider caramels and pumpkin truffles for a seasonal treat assortment celebrating fall flavors.
Creative Variations
This foundation recipe welcomes numerous adaptations based on preference or available ingredients. For tropical flair, add 1/3 cup toasted coconut flakes to the cookie dough and substitute coconut extract for vanilla in the filling. Those preferring additional texture might incorporate 1/2 cup toasted chopped pecans or walnuts into the dough for pleasant crunch throughout. Dried fruit enthusiasts can experiment beyond raisins with chopped dried apricots or cherries that provide chewy contrast to the soft cookies. For a holiday spin, add 1/4 teaspoon of cardamom to the spice blend and a touch of orange zest to the filling for sophisticated winter flavor. Those seeking less sweetness might reduce the filling sugar by 1/4 cup and add an extra pinch of salt for a more pronounced cream cheese tanginess. For mini dessert platters, prepare smaller cookies using a teaspoon measure and reduce baking time accordingly.
 Pin it
Freshness Strategies
These cookies maintain excellent quality when properly stored, though their incredible flavor means leftovers rarely linger. Due to the cream cheese filling, store assembled sandwich cookies in an airtight container in the refrigerator where they keep beautifully for up to three days. For longer storage, freeze unfilled cookies in an airtight container with parchment between layers for up to three months. The filling can be prepared ahead and refrigerated separately for up to one week, allowing you to assemble fresh sandwiches as needed. When serving from the refrigerator, allow cookies to stand at room temperature for 15 minutes to soften the filling to the ideal creamy consistency. For potlucks or gatherings where refrigeration might be unavailable, consider using a stabilized filling by incorporating 1 teaspoon of meringue powder into the confectioners' sugar, which helps the cream cheese maintain proper texture at room temperature for several hours.
After perfecting this recipe through countless iterations, I've come to appreciate these cookies not just for their delicious flavor but for how they transform a beloved classic into something new while honoring its essential character. What begins as simple ingredients becomes, through careful preparation and thoughtful combination, an elevated dessert that captures the essence of carrot cake while creating its own distinct identity. The interplay between spiced cookie, fresh carrots, and nutty brown butter filling creates complexity typically found only in far more elaborate desserts. While bakery versions often sacrifice quality for convenience, these homemade treasures deliver balanced flavor and perfect texture that remind us why making something from scratch can be such a rewarding experience.
Frequently Asked Questions
- → How do I properly brown butter for the filling?
- To properly brown butter: Melt it in a light-colored saucepan over medium heat (light color helps you see the browning). Stir frequently as it begins to foam. Watch carefully as the milk solids begin to turn golden and then brown, and the butter develops a nutty aroma - this takes about 5-7 minutes. Remove from heat immediately when it reaches a medium amber color, as it can burn quickly. Pour it into a heatproof bowl right away including the browned bits at the bottom which contain lots of flavor. Let it cool completely before using in the filling for optimal texture.
- → Can I make these cookies without the filling as regular cookies?
- Absolutely! These carrot cake oatmeal cookies are delicious on their own without the filling. Simply follow the cookie portion of the recipe and enjoy them as drop cookies. They'll still have the wonderful spiced carrot cake flavor and chewy texture. If you'd like to add a simpler topping, you could drizzle them with a basic glaze made from powdered sugar and a little milk or cream, which would provide some sweetness similar to the cream cheese filling but with much less effort.
- → How finely should I grate the carrots for these cookies?
- For the best texture, use the small holes on a box grater to finely grate the carrots. The carrots should be very fine, almost like carrot pulp, not coarse shreds. This fine texture allows the carrots to blend seamlessly into the cookie dough, providing moisture and flavor without creating noticeable pieces in the finished cookies. Pre-shredded carrots from the grocery store are typically too coarse and dry for this recipe, so it's important to grate fresh carrots right before mixing your dough.
- → Can I add nuts or raisins to these carrot cake cookies?
- Yes, you can add 1/2 cup of raisins and/or chopped nuts to the cookie dough as noted in the optional ingredients. Chopped walnuts or pecans work particularly well with the carrot cake flavor profile. For the nuts, toast them lightly before adding to enhance their flavor. If using both nuts and raisins, consider using 1/4 cup of each to maintain the proper ratio of add-ins to dough. Add them when you stir in the oats, folding gently to distribute evenly throughout the dough.
- → How do I store these sandwich cookies and how long will they keep?
- Because of the cream cheese filling, these sandwich cookies should be stored in an airtight container in the refrigerator for up to 3 days. For the best flavor and texture, let them come to room temperature for about 15-20 minutes before serving, although some people enjoy them cold straight from the refrigerator. If you want to keep them longer, you can freeze them for up to 3 months. To freeze, place them in a single layer on a baking sheet until frozen solid, then transfer to an airtight container with parchment paper between layers. Thaw in the refrigerator overnight before serving.
- → Can I prepare components of these cookies ahead of time?
- Yes, several components can be prepared ahead: The brown butter cream cheese filling can be made up to 5 days in advance and stored in an airtight container in the refrigerator. Let it come to room temperature and stir well before using. The cookie dough can be made and refrigerated up to 2 days before baking. You can also scoop the dough into balls and freeze them for up to 3 months, then bake directly from frozen (add 1-2 minutes to the baking time). Fully baked cookies (without filling) can be stored in an airtight container at room temperature for up to 3 days before assembling with filling.