
 Pin it
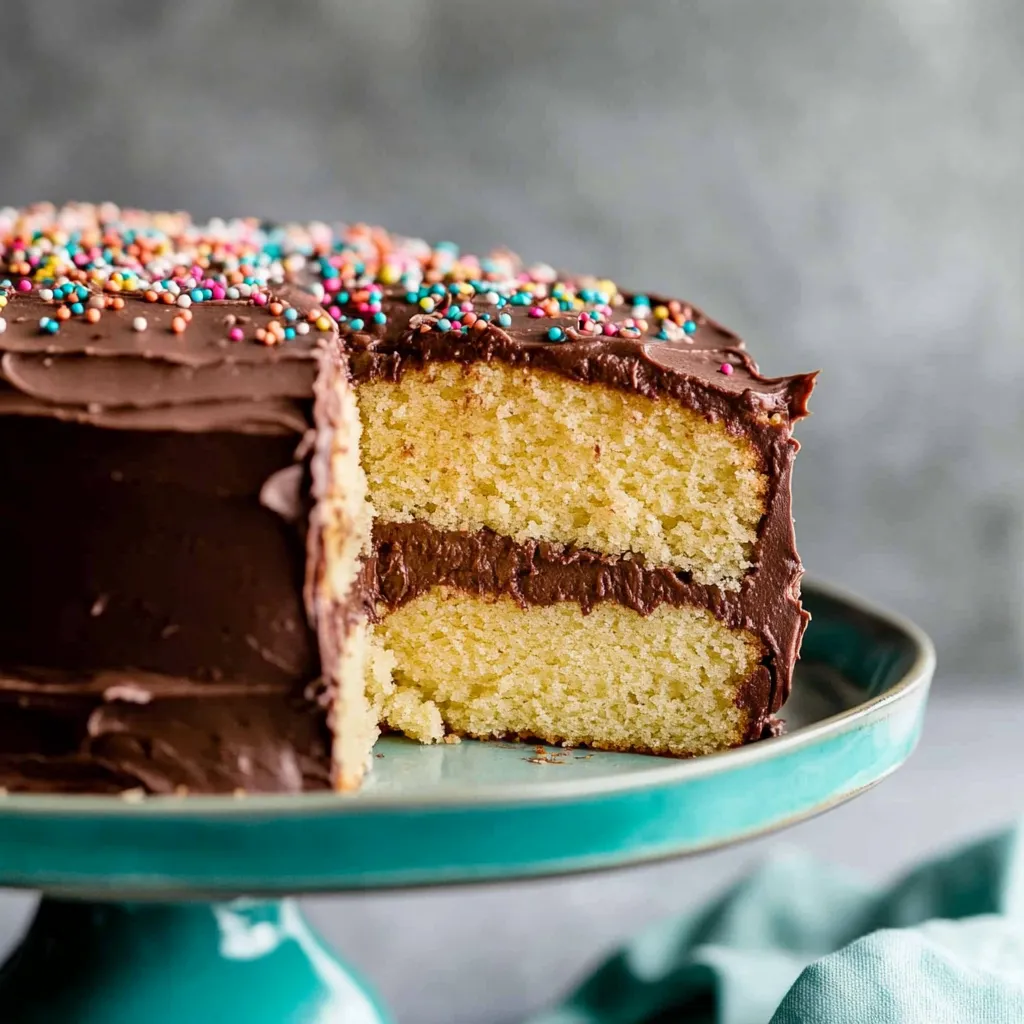
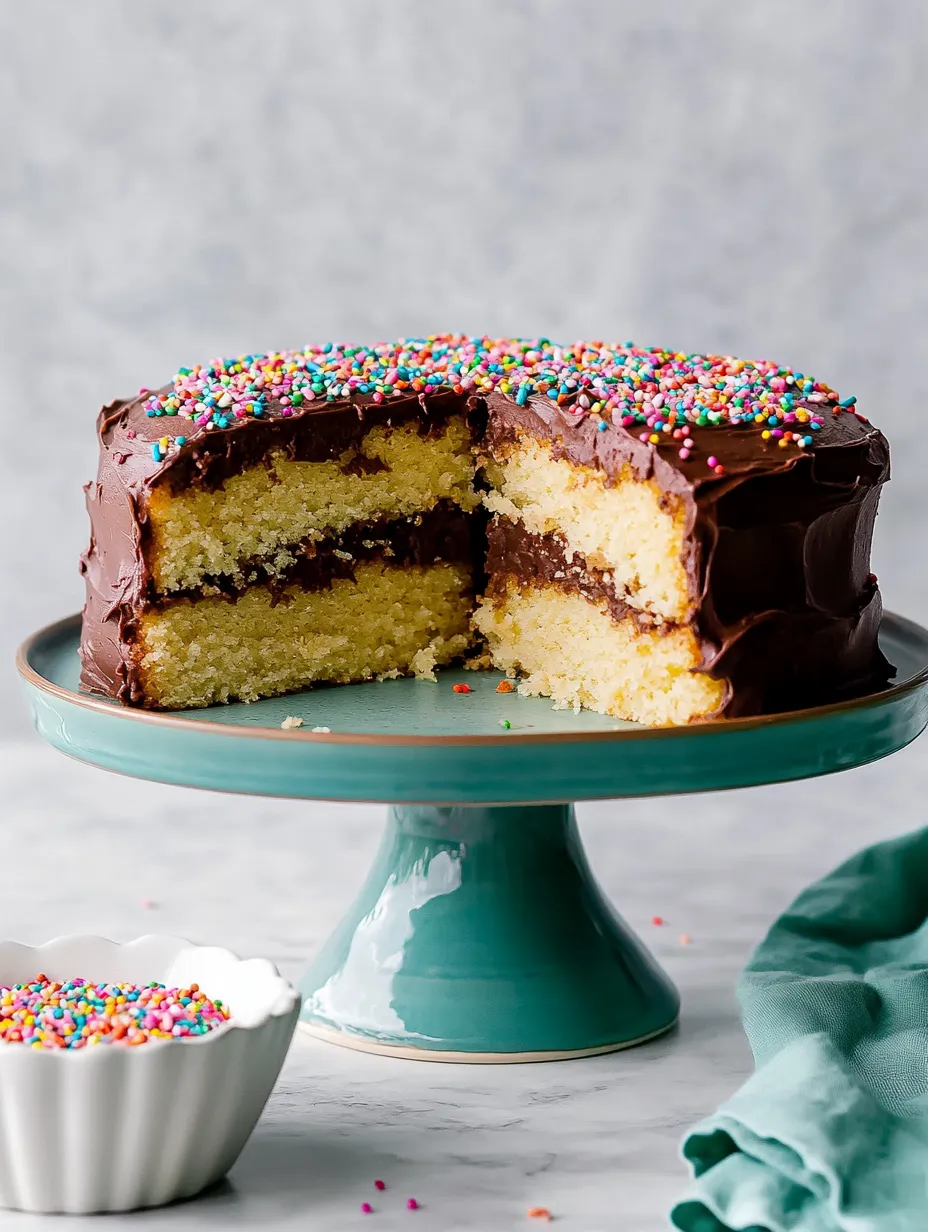
Golden Celebration Cake
This extraordinary yellow cake delivers the elusive combination of velvety soft texture and rich buttery flavor that defines the perfect birthday cake. The magic lies in a carefully developed technique that incorporates whipped egg whites for lightness while extra yolks provide unmistakable richness. I spent countless weekends testing different methods before discovering this precise balance that creates celebration worthy results every time.
Bakery Quality
My journey to perfect this cake began when planning my daughter's fifth birthday. After years of bakery disappointments and boxed cake compromises, I was determined to create something truly special. What started as a simple recipe mission evolved into an obsession with understanding the chemistry behind the perfect yellow cake. Even my husband, who typically shows little interest in baking projects, began asking when the next test batch would be ready after tasting this version.
Scientific Selection
- Cake Flour (2 1/2 cups): The lower protein content creates a more tender structure with less gluten development that results in the characteristic velvety crumb of fine cakes
- Unsalted Butter (1 cup): Provides essential rich flavor while allowing precise control of salt content for perfect balance
- Granulated Sugar (1 3/4 cups): Creates the ideal level of sweetness while contributing to moisture retention and the delicate texture
- Egg Yolks (4): Add richness, color and fat that creates the signature yellow cake flavor while contributing to a luxurious mouthfeel
- Egg Whites (2): Incorporate essential air when whipped, creating structure and lightness that prevents the cake from becoming dense
- Buttermilk (1 cup): Adds tanginess that balances the sweetness while its acidity activates the leavening agents for proper rise
- Cream of Tartar (1/8 teaspoon): Stabilizes the whipped egg whites, helping maintain their volume during folding and baking
- Vanilla Extract (2 teaspoons): Enhances all other flavors while adding depth that complements the butter and eggs perfectly
 Pin it
Bakery Technique
- Foundation Preparation:
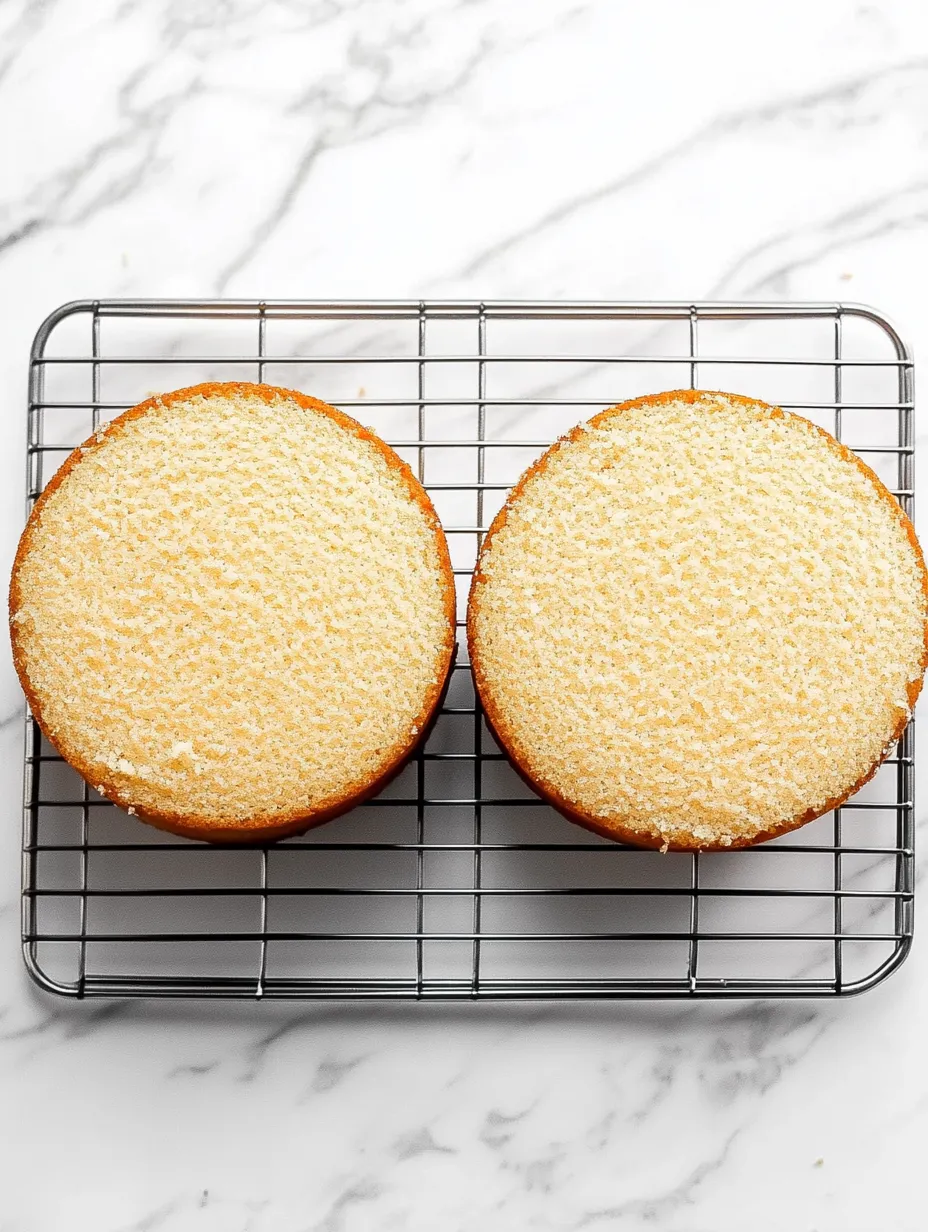
- Begin by positioning your oven rack in the center position and preheating to 350°F. This specific temperature creates the ideal environment for even heat distribution and proper rise. Prepare two 9 inch round cake pans meticulously by greasing the bottoms and sides, lining with parchment paper circles, then greasing the parchment and dusting lightly with flour. This thorough preparation ensures seamless release after baking. In a medium bowl, whisk together the cake flour, baking powder, baking soda, and salt. Mixing these dry ingredients separately ensures they will be evenly distributed throughout the batter, preventing uneven leavening or texture issues. Set this mixture aside while preparing the remaining components.
- Butter Transformation:
- In the bowl of a stand mixer fitted with the paddle attachment, place the room temperature butter. It should be soft enough to indent when pressed but still cool to the touch and holding its shape. Beat the butter on medium high speed for one full minute until noticeably lighter in color and texture. With the mixer running on medium speed, gradually add the granulated sugar in a steady stream over 30 seconds. Once all sugar is incorporated, increase speed to medium high and cream the mixture for a full three minutes, stopping once to scrape down the bowl and paddle. This extended creaming process incorporates essential air into the butter while dissolving sugar crystals, creating the foundation for a fine textured cake. The mixture should become very light, almost white in color, and significantly increased in volume.
- Strategic Incorporation:
- Reduce mixer speed to medium low and add egg yolks one at a time, allowing each to fully incorporate before adding the next. This gradual addition prevents the emulsion from breaking, which would result in a heavy, greasy texture. Add the vanilla extract with the final yolk. With the mixer on low speed, add one third of the dry ingredient mixture, mixing just until no dry streaks remain. Pour in half the buttermilk, mixing until combined. Continue this alternating pattern, ending with the final third of dry ingredients. This method prevents overworking the batter while ensuring even hydration of the flour. In a separate clean, grease free bowl, use a hand mixer to whip the egg whites and cream of tartar on medium high speed until soft peaks form, approximately 2 to 3 minutes. The whites should hold their shape when the beaters are lifted but the tip of the peak should fold over gently.
- Gentle Completion:
- Using a large rubber spatula, add one third of the whipped egg whites to the cake batter, folding gently but thoroughly to lighten the mixture. Add the remaining whites in two additions, using a careful under and over folding motion to preserve as much air as possible while ensuring no white streaks remain. The proper folding technique involves cutting through the center of the mixture with the spatula, scraping along the bottom of the bowl, and folding the mixture over itself in a rotation. Divide the batter evenly between the prepared pans, using a kitchen scale if available for perfect balance. Smooth the tops gently with the spatula. Tap each pan firmly on the counter two or three times to release any large air bubbles that could create holes in the finished cake.
- Baking Perfection:
- Place pans in the preheated oven with at least 2 inches between them and the oven walls to allow proper air circulation. Bake for 25 to 28 minutes, loosely tenting with aluminum foil after 15 minutes if the tops are browning too quickly. The cakes are done when a toothpick inserted in the center comes out with a few moist crumbs but no wet batter. Avoid opening the oven door before 20 minutes has passed to prevent temperature fluctuations that could cause sinking. Allow the finished cakes to cool in pans for exactly 10 minutes, which gives the structure time to set while preventing excessive moisture loss from residual heat. Run a thin knife around the edges before inverting onto cooling racks, then immediately turn right side up and allow to cool completely before frosting.
Chocolate Complement
- Frosting Creation:
- While the cakes cool, prepare the chocolate buttercream that perfectly balances this yellow cake. In the clean bowl of your stand mixer fitted with the paddle attachment, beat the room temperature unsalted butter on medium speed until completely smooth and creamy, about 2 minutes. This creates the silky base for your frosting. Sift together the confectioners' sugar and cocoa powder to remove any lumps that would create a grainy texture. With the mixer on low speed, gradually add this dry mixture to the butter, incorporating completely after each addition. Once all dry ingredients are added, increase speed to medium and beat for 2 full minutes until lightened in color and texture. Add 3 tablespoons of heavy cream, salt, and vanilla extract, beating for an additional minute. Assess the consistency and add additional cream if needed for a perfectly spreadable texture. The ideal frosting should hold soft peaks when the paddle is lifted but spread smoothly without tearing the cake.
- Assembly Artistry:
- Once cakes are completely cool, use a long serrated knife to level the tops if needed, creating flat surfaces for stacking. Place one layer on a cake stand or serving plate, securing with a small dot of frosting underneath if desired. Spread approximately 1 cup of the chocolate buttercream in an even layer across the top, extending just slightly beyond the edges. Place the second layer top side down for a completely flat finishing surface. Apply a thin layer of frosting over the entire cake to seal in crumbs, then refrigerate for 15 minutes to set this crumb coat. Apply the remaining frosting, creating decorative swirls if desired. For the cleanest slices, refrigerate the fully frosted cake for 30 minutes before serving, which firms the frosting slightly for neater cutting.
I particularly love serving this cake for milestone celebrations. Growing up, my mother always made a similar yellow cake for birthdays, though her version came from a box with canned frosting. The first time I served this homemade version to her, she became emotional, saying it tasted like her mother's cake from childhood. These food connections across generations make the effort of perfecting recipes worthwhile. When my son requested this cake for his graduation celebration, seeing his friends amazed that a homemade cake could taste better than bakery versions made all the testing iterations worthwhile.
Customization Canvas
This exceptional base recipe welcomes numerous adaptations depending on the occasion or preference. For a traditional birthday cake, add colorful sprinkles to the batter just before folding in the egg whites, creating a festive confetti cake that maintains the superior texture. Coffee enthusiasts might appreciate substituting coffee for the vanilla extract or adding espresso powder to the chocolate frosting for mocha depth. Those seeking alternative frosting options might consider cream cheese frosting with lemon zest for brightness, or vanilla Swiss meringue buttercream for elegant sophistication. For individual servings, divide the batter among 24 cupcake liners, reducing baking time to 18 to 20 minutes. Layer cake aficionados can create a stunning three layer version by dividing between three 8 inch pans and reducing baking time slightly to account for thinner layers.
Preservation Pointers
This cake maintains excellent quality when properly stored, with the buttercream actually helping seal in moisture. For short term storage, keep frosted cake at cool room temperature under a cake dome for up to 24 hours. For longer storage, refrigerate in a cake keeper or loosely tented with plastic wrap for up to 5 days, allowing slices to come to room temperature before serving for optimal flavor and texture. Unfrosted cake layers freeze beautifully for up to 3 months when double wrapped in plastic and stored in freezer bags with air removed. Thaw overnight in the refrigerator before unwrapping to prevent condensation from making the surface soggy. Surprisingly, completely frosted cakes also freeze well for up to 2 months when placed unwrapped in the freezer until solid, then wrapped tightly. This flash freezing method prevents frosting from sticking to the wrap during storage.
 Pin it
After perfecting this recipe through countless iterations, I've come to appreciate the science behind baking while still embracing the joy it brings. What began as a practical quest for a birthday cake has evolved into understanding how each ingredient and technique contributes to the final result. The slightly tangy note from buttermilk, the richness from extra egg yolks, and the lightness from whipped whites create perfect harmony in this cake. While boxed mixes offer convenience, they simply cannot match the flavor complexity and tender crumb of this homemade version. The wonder in someone's eyes when they taste a truly exceptional cake makes the extra effort worthwhile, turning ordinary celebrations into memorable experiences through the simple pleasure of a perfect yellow cake.
Frequently Asked Questions
- → Why do I need to use cake flour for this yellow cake?
- Cake flour is essential because it has a lower protein content (about 7-9%) compared to all-purpose flour (10-12%). This lower protein means less gluten development, resulting in a more tender, delicate crumb structure that's characteristic of a perfect yellow cake. Substituting all-purpose flour would create a denser, tougher cake that lacks the light, soft texture this recipe aims for.
- → Why does this recipe separate the egg whites and yolks?
- Separating the eggs and whipping the whites with cream of tartar creates a lighter texture. The egg yolks add richness and color to the batter, while the separately whipped egg whites incorporate air that helps the cake rise and creates a fluffier, more tender crumb. This technique essentially provides the benefits of both butter cakes (rich flavor) and sponge cakes (light texture) in one recipe.
- → Can I make this cake in advance?
- Yes, this cake works well for advance preparation. The baked and cooled cake layers can be wrapped tightly and kept at room temperature for 1 day or frozen for up to 3 months. The frosting can be made 1 day ahead and refrigerated (bring to room temperature and re-whip before using). A completely frosted cake can be refrigerated for up to 5 days or frozen for up to 3 months.
- → Why is my cake sinking in the middle?
- Cake sinking can occur for several reasons: 1) Opening the oven door too early during baking, 2) Underbaking the cake, 3) Overmixing the batter after adding the flour, which develops too much gluten, or 4) Expired leavening agents (baking powder/soda). Make sure to follow the mixing instructions carefully, check that your baking powder is fresh, and resist opening the oven door until at least 20 minutes into baking.
- → Can I use this recipe for cupcakes instead of a layer cake?
- Yes, this batter works well for cupcakes. The recipe will yield about 24-30 cupcakes. Fill cupcake liners about 2/3 full and bake at 350°F for 18-22 minutes, or until a toothpick inserted in the center comes out clean. The provided amount of frosting should be enough to frost all the cupcakes with a moderate amount on each.
- → Why does the recipe call for room temperature ingredients?
- Room temperature ingredients are crucial for proper emulsification and even mixing. Cold butter won't cream properly with sugar, creating a dense cake. Cold eggs can cause the batter to curdle or separate. Room temperature buttermilk incorporates more evenly into the batter. For best results, set butter, eggs, and buttermilk out about 1 hour before beginning, or use this quick method: place eggs in warm water for 10 minutes and microwave buttermilk in 10-second intervals until just room temperature.