
 Pin it
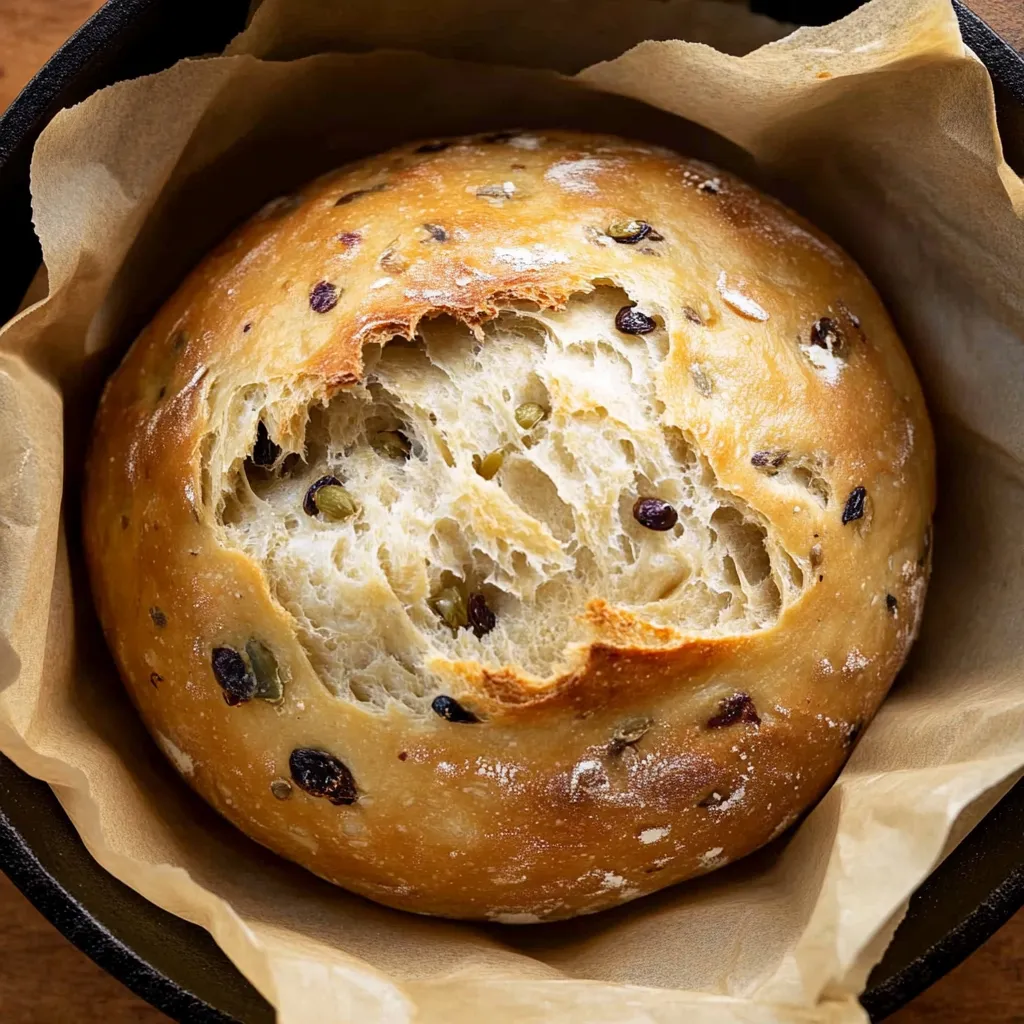
Olive Bread
This olive bread transforms simple ingredients into an artisanal masterpiece through traditional slow fermentation that develops complex flavor impossible to achieve through shortcuts. The golden exterior crust shatters pleasantly with each bite, revealing a tender interior studded with two varieties of olives that provide contrasting notes of brininess and fruitiness. Aged parmesan and asiago cheeses melt subtly into the crumb, creating pockets of savory richness that complement the olives perfectly. The hint of garlic weaves throughout without dominating, enhancing the Mediterranean character while creating irresistible aroma during baking. This bread embodies rustic elegance that elevates everything from a simple dinner to an elaborate gathering.
I first created this recipe after returning from a trip to southern Italy where local bakeries produced olive bread that put American versions to shame. Determined to recreate that authentic experience at home, I experimented with various techniques until discovering that time serves as the essential ingredient. My first properly fermented loaf transported me instantly back to that small village bakery, and now friends request this bread specifically for gatherings. The ability to mix the dough in minutes then let time do the work makes this approachable even for busy schedules while producing truly exceptional results.
Superior Ingredients
- All purpose flour: Provides perfect structure while remaining accessible for home bakers. Its protein content creates ideal chew without requiring specialty bread flours
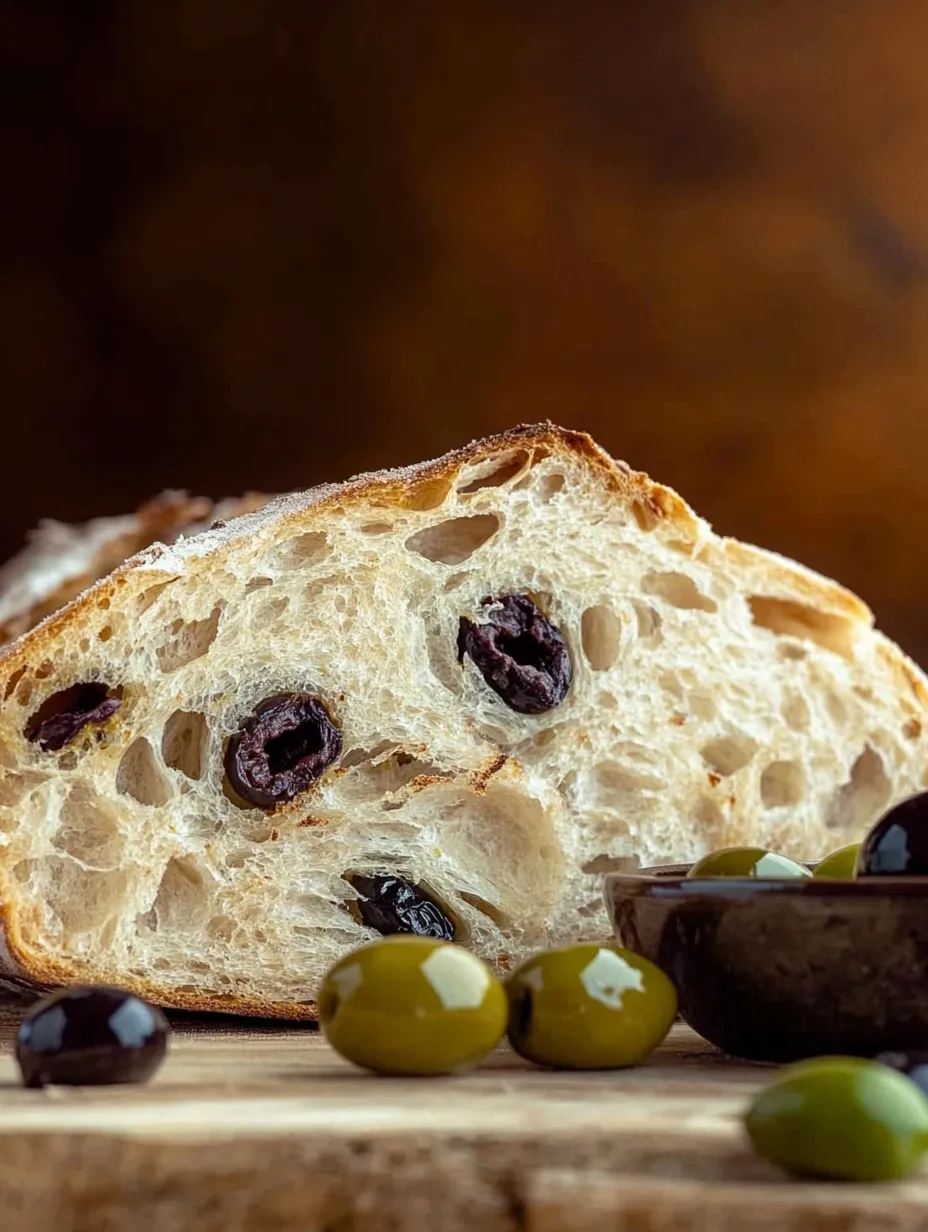
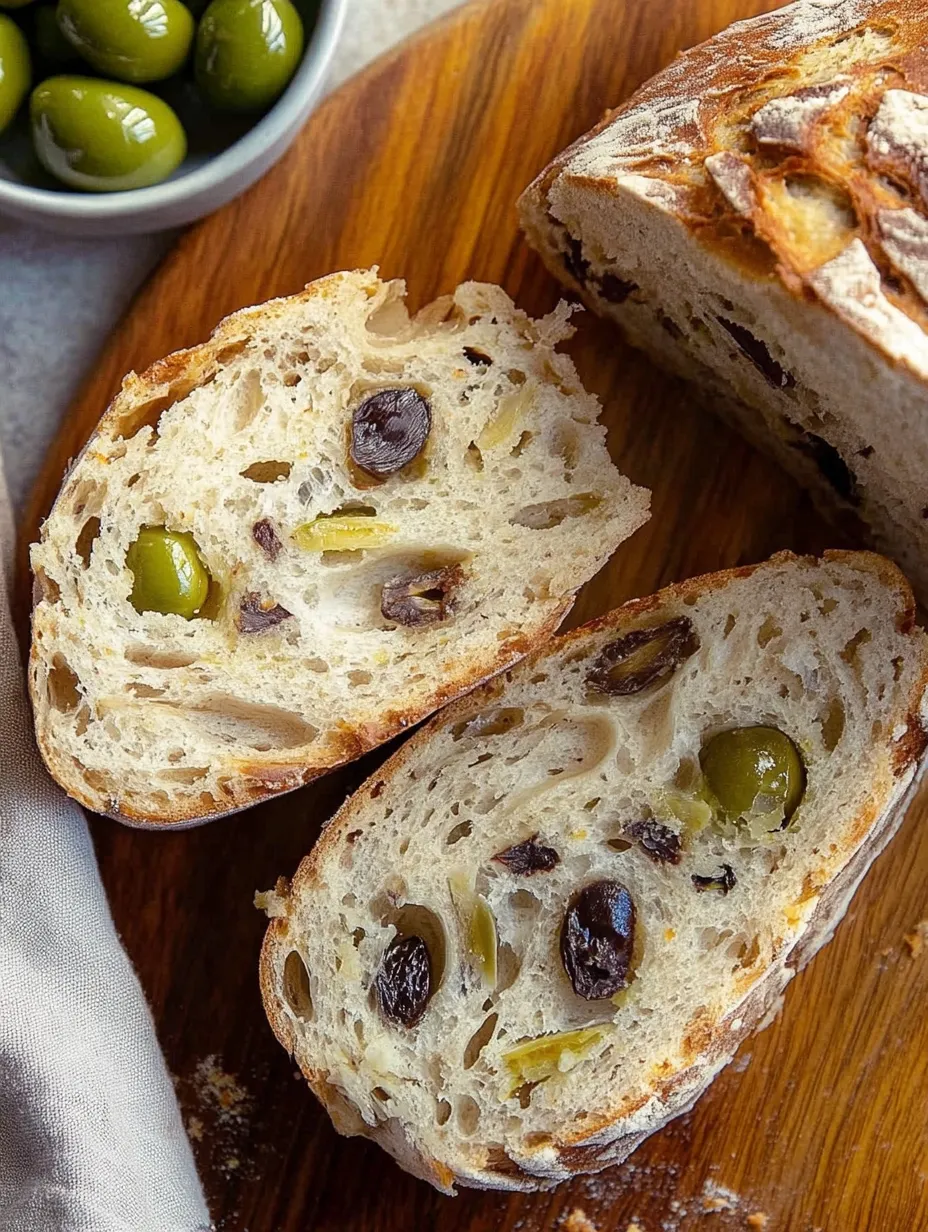
- Castelvetrano olives: Contribute buttery texture and mild flavor that allows other ingredients to shine. Their vibrant green color creates beautiful visual contrast within the loaf
- Kalamata olives: Provide deeper, more intense flavor with fruity undertones that complement their natural brininess. Their purple black color adds dramatic visual interest
- Parmesan cheese: Introduces nutty complexity and subtle crystalline texture throughout the crumb. Aged varieties provide superior depth compared to younger versions
- Asiago cheese: Offers slightly sharper notes than parmesan with distinctive creaminess that creates perfect counterpoint to the olives
The quality of olives dramatically impacts the final bread. I once prepared this recipe with standard canned black olives from the supermarket and found the flavor disappointingly flat compared to versions made with proper Mediterranean varieties. Taking time to source quality olives creates remarkable difference in the finished loaf. Similarly, freshly grated cheese rather than pre packaged varieties ensures proper melting and flavor distribution throughout the bread.
 Pin it
Artisan Technique
- Combine With Care:
- Begin by whisking together all purpose flour, kosher salt, and rapid rise yeast in a large mixing bowl, ensuring even distribution of leavening throughout the dough. Add room temperature water and stir with a wooden spoon or dough whisk until no dry flour remains visible. The dough will appear shaggy and somewhat sticky at this stage, which is exactly the texture needed for proper development. Fold in chopped Castelvetrano olives, Kalamata olives, freshly grated parmesan, asiago cheese, and minced garlic just until evenly distributed throughout. Overmixing at this stage would develop too much gluten too quickly, so gentle incorporation creates better final texture.
- Harness Fermentation:
- Transfer the mixed dough to a clean bowl lightly greased with olive oil, turning once to coat the surface which prevents drying during fermentation. Cover the bowl with plastic wrap or a damp kitchen towel and place in a draft free location at room temperature. Allow the dough to ferment slowly for 18 hours, during which time natural enzymes will break down complex starches into flavorful sugars while beneficial bacteria create subtle sourdough notes without requiring a separate starter. This extended fermentation develops depth impossible to achieve through quick methods, transforming basic ingredients into extraordinary bread with minimal hands on effort.
- Shape With Intention:
- After fermentation, the dough will have doubled in size with a bubbly surface indicating active fermentation. Place a piece of parchment paper on your counter and dust generously with flour to prevent sticking. Gently release the dough onto this surface, being careful not to deflate the air bubbles that have developed during fermentation. Using lightly floured hands, stretch and fold the dough from each side toward the center, creating surface tension that will support proper rising during baking. Form into a rounded loaf approximately 8 inches in diameter, then allow to rest uncovered for 30 minutes while preparing for baking.
- Prepare For Transformation:
- While the shaped dough rests, place a Dutch oven with its lid in a cold oven, then set temperature to 450°F and allow both to preheat together. This simultaneous heating prevents thermal shock to the vessel while ensuring it reaches proper temperature. After the dough has rested for 30 minutes, use a sharp knife or razor blade to score an "X" pattern approximately 1/4 inch deep across the top surface. This controlled scoring allows for proper expansion during baking rather than random splitting that would occur naturally. The deliberate scoring also creates visual appeal in the finished loaf while serving the practical purpose of controlled steam release.
- Bake To Perfection:
- When the oven has fully preheated, carefully remove the hot Dutch oven using heavy protection for your hands. Lift the parchment paper with the dough and gently lower the entire thing into the Dutch oven, allowing the parchment to line the bottom. Cover with the preheated lid and return to the oven immediately. Bake covered for 30 minutes, which creates steam within the vessel that develops perfect crust formation. Remove the lid and continue baking for approximately 15 minutes until the crust develops a beautiful golden brown color with darker areas where the olives and cheese have caramelized slightly at the surface.
I discovered through experimentation that starting with a cold Dutch oven rather than preheating it empty creates significantly better oven spring and crust development. During early attempts following traditional preheating methods, I found the bread sometimes flattened when transferred to the scorching hot vessel. The cold start method allows the dough to begin rising gradually as the vessel heats, creating optimal expansion without requiring potentially dangerous maneuvers with extremely hot cookware. This simple adjustment transforms good bread into exceptional bread while actually simplifying the process.
My father, typically indifferent toward homemade bread experiments, actually requested this loaf specifically after his first taste, commenting that it reminded him of bread from his favorite Italian restaurant. The distinctively Mediterranean flavor profile creates immediate associations with quality dining experiences, elevating simple meals into something special. The exceptional crust and tender interior demonstrate why traditional bread making methods have endured for generations despite our modern attraction to convenience and speed.
Perfect Pairings
Serve thick slices of this remarkable bread alongside herb infused olive oil for dipping, creating an elegant appetizer with minimal additional preparation. For complete antipasto experience, accompany with high quality cured meats, additional cheeses, and marinated vegetables. The bread also pairs beautifully with hearty soups like Italian wedding or Tuscan white bean, where tearing pieces allows perfect capture of broth. For impressive yet simple sandwiches, layer slices with fresh mozzarella, sliced tomatoes, and basil leaves, then drizzle with balsamic glaze for instant gourmet lunch that showcases the bread's flavor.
Creative Adaptations
Consider incorporating different olive varieties based on availability and preference, maintaining the balance between mild and more assertive flavors. Mediterranean herbs like rosemary or thyme make excellent additions, adding aromatic notes that complement the olives beautifully. For additional texture, fold in toasted pine nuts or chopped walnuts along with the olives. Experiment with cheese variations including pecorino romano for sharper flavor or fontina for creamier pockets throughout the bread. These thoughtful adaptations maintain the bread's essential character while creating distinctive variations that prevent flavor fatigue with repeated baking.
Preservation Wisdom
Store this bread properly to maintain its exceptional texture and flavor for several days. Once completely cooled, wrap the loaf in a clean kitchen towel and store in a dark place at room temperature, which preserves the crust integrity better than plastic bags that trap moisture. For longer storage, wrap tightly in aluminum foil once completely cooled, then place inside a freezer bag with air removed before freezing. Frozen bread maintains excellent quality for up to three months. Thaw at room temperature in its wrapping, then refresh by heating in a 450°F oven for 5 to 7 minutes directly on the rack, which revives the crust beautifully.
Serving Suggestions
Beyond traditional table bread applications, this olive loaf creates extraordinary grilled cheese sandwiches when sliced and filled with additional cheese like gruyere or provolone. The olive and cheese flavors already present in the bread enhance rather than compete with the filling. Create exceptional crostini by slicing thinly, brushing with olive oil, and toasting until crisp, then topping with tomato bruschetta or roasted red pepper spread. Transform day old bread into remarkable croutons for Caesar salad by cutting into cubes, tossing with olive oil and additional minced garlic, then baking until golden and crisp. The flavor infused crumb adds remarkable dimension to salads, soups, and stuffings.
 Pin it
Baking Science
Understanding the science behind this bread helps appreciate how it achieves artisanal quality through simple methods. The extended fermentation allows naturally occurring enzymes to break down complex carbohydrates into simpler sugars, creating both flavor and better digestibility. This slow process develops gluten naturally without excessive kneading, resulting in perfect texture. The initial covered baking period creates a steam environment that allows maximum expansion before setting the crust, while the uncovered portion develops color and flavor through Maillard reactions. The cold start method prevents premature crust formation that would limit proper rising, creating optimal structure throughout the loaf.
The first time I served this bread at a dinner gathering, conversation completely stopped as everyone reached for seconds before finishing their main course. One guest later admitted to wrapping a piece in a napkin to take home because she couldn't bear leaving without more. This reaction perfectly captures why mastering this recipe creates such satisfaction, delivering exceptional results that connect people through shared appreciation of something seemingly simple yet extraordinarily special. The combination of accessibility and excellence makes this a recipe worth adding to your permanent collection.
Frequently Asked Questions
- → Can I use different types of olives in this bread?
- Absolutely! While the recipe calls for Castelvetrano and Kalamata olives for their complementary flavors (buttery and mild vs. rich and briny), you can use any combination of olives you enjoy. Manzanilla, Nicoise, or even stuffed green olives would work well. Just maintain the same total amount (1 cup chopped) and be sure they're well-drained and pitted. Chopping the olives rather than leaving them whole ensures better distribution throughout the bread.
- → Do I really need to let the dough rise for 18 hours?
- The 18-hour rise time is recommended for optimal flavor development and texture, but it's not absolutely required. As noted in the recipe, you can reduce the rise time to as little as 3 hours if you're in a hurry. The trade-off is that the shorter rise will result in a tighter crumb (fewer air pockets) and less complex flavor. If possible, aim for at least 8-12 hours, which is a good compromise. The long rise is what makes this no-knead method work - time replaces the physical kneading that would normally develop the gluten structure.
- → Can I make this bread without a Dutch oven?
- While a Dutch oven creates the ideal environment for baking artisan bread, you can still make this recipe without one. Alternative methods include: 1) A heavy oven-safe pot with a tight-fitting lid, 2) A pizza stone or baking steel with a large metal bowl placed over the dough for the first 30 minutes (to trap steam), 3) A baking sheet with a separate pan of hot water placed on the bottom rack to create steam. The key is creating an environment that traps moisture during the initial baking phase. Your crust might not be quite as crisp, but the bread will still be delicious.
- → How should I store this bread to keep it fresh?
- For short-term storage (1-2 days), wrap the completely cooled bread in a clean kitchen towel or place it cut-side down on a cutting board. Avoid plastic bags, which trap moisture and make the crust soft. For longer storage, slice the bread once completely cool, place parchment paper between slices if desired, and freeze in an airtight container or freezer bag for up to 3 months. Defrost slices at room temperature or toast them straight from frozen. If the whole loaf has gone slightly stale, you can refresh it by sprinkling it lightly with water and heating it in a 350°F oven for 5-10 minutes.
- → Can I make this bread without cheese to make it dairy-free?
- Yes, you can absolutely make this bread dairy-free by omitting the parmesan and asiago cheeses. To compensate for the flavor, consider adding: 1) 2 tablespoons of nutritional yeast for a cheesy flavor, 2) An extra teaspoon of minced garlic or 1/2 teaspoon of garlic powder, 3) 1 teaspoon of dried herbs like oregano, basil, or herbes de Provence, 4) A tablespoon of olive oil to add richness, 5) An additional 1/4 teaspoon of salt. The bread will still be delicious with just the olives and garlic, but these additions help replace some of the savory depth that the cheese provides.
- → Why is my bread dense instead of airy?
- Several factors can lead to a denser loaf: 1) Insufficient rising time - the slow rise is crucial for developing the gluten network that traps air bubbles, 2) Room temperature that's too cool during rising - ideal temperature is around 70-75°F, 3) Flour with low protein content - try bread flour instead of all-purpose for more structure, 4) Overhandling the dough when shaping - be gentle to preserve air bubbles, 5) Dutch oven not hot enough - preheat thoroughly, 6) Dough too dry - the mixture should be wet and sticky, not firm. If your first attempt is dense, try giving the dough a longer rise time and handling it more gently during shaping.